MODEL
VIEW
CONTROLL
MVC 라고 부르는 것에 대해 공부해보자
시작에 앞서
porn.xml에서 버전을 5.1.2.release로 변경후

pom.xml 파일을 열어서
<!-- file upload -->
<dependency>
<groupId>commons-io</groupId>
<artifactId>commons-io</artifactId>
<version>1.4</version>
</dependency>
<dependency>
<groupId>commons-fileupload</groupId>
<artifactId>commons-fileupload</artifactId>
<version>1.2.2</version>
</dependency>
해당 코드를 넣어주자
해당 코드를 통해서 위 라이브러리를 불러와서 작동할 수 있도록 해준다
위 코드가 없으면 파일 업로드가 불가하기에 넣어줬다
servlet-context.xml 파일에서
resources 경로와
image 경로를 변경하는데
전체경로로 주면 힘들기때문에
내가 원하는 경로로 수정해서 편하게 불러오도록 해준다

base-package또한 * 를 이용해서 편하게 불러오도록 설정을 바꿔주자

post 방식일 때 한글이 깨지지 않도록
<!-- hangul encoding -->
<filter>
<filter-name>encodingFilter</filter-name>
<filter-class>
org.springframework.web.filter.CharacterEncodingFilter
</filter-class>
<init-param>
<param-name>encoding</param-name>
<param-value>utf-8</param-value>
</init-param>
</filter>
<filter-mapping>
<filter-name>encodingFilter</filter-name>
<url-pattern>/*</url-pattern>
</filter-mapping>
코드를 web.xml파일에 붙여넣기해주자
새로 만든 스프링파일의 버전을 11버전으로
변경해주자 build path와 compiler 둘다 변경해주자
오늘 공부 목표는
폼 데이터를 읽는 것부터 하는데
dto로 폼 전체 읽기
map으로 폼 전체 읽기
사진 업로드 1개 하기
사진 업로드 여러개 하기
이렇게 공부해보자
우선 필요한 파일먼저 전부 만들어놓고 시작하자
*추가적으로 run은 항상 mvc파일에서 우클릭해야한다 파일에서 하면 에러가나온다
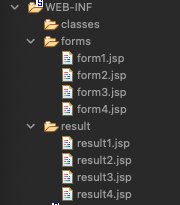
WEB-INF폴더에
forms
result폴더를 만들고
1~4까지파일을 각 폴더에 만들어주자
패키지 하나를 새로 만들어서
컨트롤러 예시 파일을 4개 만들자
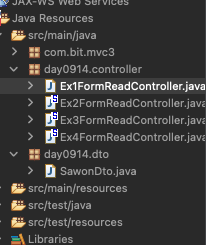
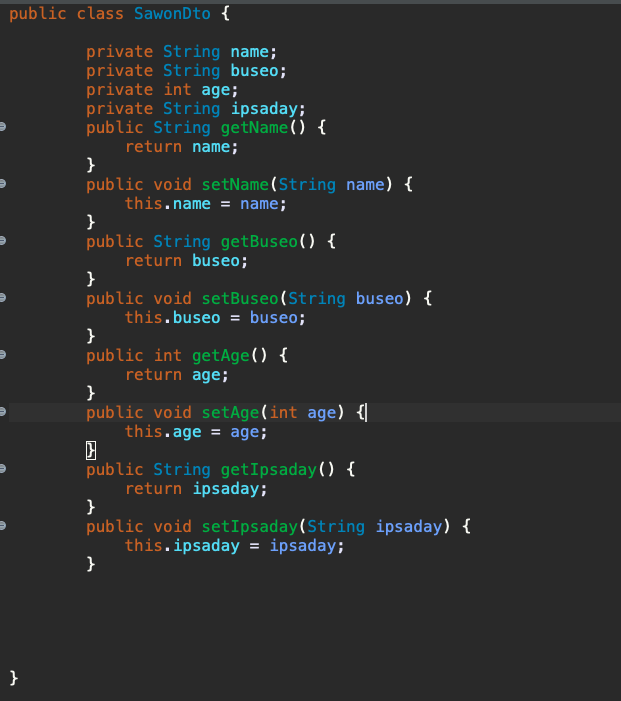
이제 dto 파일을 하나 만들어서
게터세터를 줘서 dto파일을 저장해두자
FormController 안에

이런식으로 넣어주고
@GetMapping("/study/form1")
public String form1() {
return "forms/form1";
}
@PostMapping("/study/read1")
public ModelAndView read1()
{
ModelAndView mview=new ModelAndView();
mview.setViewName("result/result1");
return mview;
}
해당 코드를 복사해서
1~4까지 붙여넣어서 뒤에숫자만 2,3,4로 수정해서
파일을 모두 작성해서 저장해두자
** 추가적으로
작성하다보면 클래스인식을 못해서 맵핑을 못찾으면 404가 자주 뜰 수 있으니
패키지와 맵핑관련해서 확인을 해보자 또한 클린을 해주면서 다시 에러를 잡아야하는데
클린 하다보면 버젼이 초기화되니 유의하자
우클릭 Maven -> update Project 까지 해보면 어지간하면 에러가 잡힌다고 볼 수 있다
또한 빨간표시가 사라지지 않으면 우클릭해서 Properties에서

해당 버전을 11로 바꿔주면 에러를 잡을 수 있다
form1을 아래와같이 작성해주자
<%@page import="java.util.Date"%>
<%@ page language="java" contentType="text/html; charset=UTF-8"
pageEncoding="UTF-8"%>
<%@ taglib prefix="c" uri="http://java.sun.com/jsp/jstl/core" %>
<%@ taglib prefix="fmt" uri="http://java.sun.com/jsp/jstl/fmt" %>
<!DOCTYPE html>
<html>
<head>
<meta charset="UTF-8">
<title>Insert title here</title>
<link
rel="stylesheet"
/>
<link rel="stylesheet"
href="https://cdn.jsdelivr.net/npm/bootstrap-icons@1.8.0/font/bootstrap-icons.css">
<link
href="https://cdn.jsdelivr.net/npm/bootstrap@5.1.3/dist/css/bootstrap.min.css"
rel="stylesheet" />
<script src="https://code.jquery.com/jquery-3.5.0.js"></script>
<style>
*{
font-family: 'Jua';
}
</style>
</head>
<body>
<div style="margin: 30px 30px;">
<form action="read1" method="post">
<table class="table table-bordered" style="width: 300px;">
<tr>
<th width="120" style="background-color:lightgray">이름</th>
<td>
<input type="text" name="name" class="form-control" required="required"
style="width: 150px;">
</td>
</tr>
<tr>
<th width="120" style="background-color:lightgray">나이</th>
<td>
<input type="text" name="age" class="form-control" required="required"
style="width: 150px;">
</td>
</tr>
<tr>
<th width="120" style="background-color:lightgray">부서</th>
<td>
<select style="width: 150px;" name="buseo">
<option value="홍보부">홍보부</option>
<option value="교육부">교육부</option>
<option value="인사부">인사부</option>
<option value="관리부">관리부</option>
</select>
</td>
</tr>
<tr>
<th width="120" style="background-color:lightgray">입사일</th>
<td>
<input type="date" name="ipsaday" class="form-control" required="required"
style="width: 150px;" value="2022-01-01">
</td>
</tr>
<tr>
<td colspan="2" align="center">
<button type="submit" class="btn btn-outline-danger">서버저장</button>
</td>
</tr>
</table>
</form>
</body>
</html>
실행하면 아래와같이 나온다

자 이제 result1으로 가보자
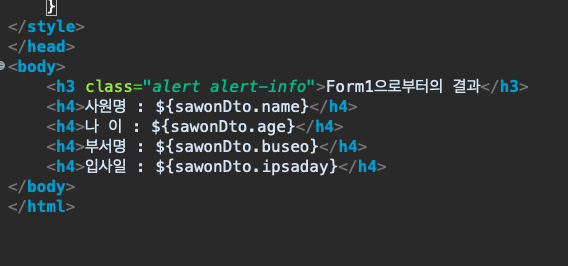
이렇게 작성해주고 저장한다음
다시 위에 서버저장을 눌러보자
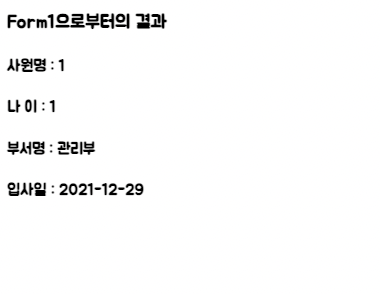
정상적으로 결과 값이 나오는 것을 볼 수 있다
dto만들기 애매하고 dto가 없을 때는
map으로 읽는데 사실 dto로 읽는방식을 가장 많이 사용한다
이번에는 map으로 읽는 것을 배워보자
form1을 복사해서
form2에 붙여넣고 살짝식 수정해주자
<%@page import="java.util.Date"%>
<%@ page language="java" contentType="text/html; charset=UTF-8"
pageEncoding="UTF-8"%>
<%@ taglib prefix="c" uri="http://java.sun.com/jsp/jstl/core" %>
<%@ taglib prefix="fmt" uri="http://java.sun.com/jsp/jstl/fmt" %>
<!DOCTYPE html>
<html>
<head>
<meta charset="UTF-8">
<title>Insert title here</title>
<link
rel="stylesheet"
/>
<link rel="stylesheet"
href="https://cdn.jsdelivr.net/npm/bootstrap-icons@1.8.0/font/bootstrap-icons.css">
<link
href="https://cdn.jsdelivr.net/npm/bootstrap@5.1.3/dist/css/bootstrap.min.css"
rel="stylesheet" />
<script src="https://code.jquery.com/jquery-3.5.0.js"></script>
<style>
*{
font-family: 'Jua';
}
</style>
</head>
<body>
<div style="margin: 30px 30px;">
<form action="read2" method="post">
<table class="table table-bordered" style="width: 300px;">
<tr>
<th width="120" style="background-color:lightgray">이름</th>
<td>
<input type="text" name="name" class="form-control" required="required"
style="width: 150px;">
</td>
</tr>
<tr>
<th width="120" style="background-color:lightgray">핸드폰</th>
<td>
<input type="text" name="hp" class="form-control" required="required"
style="width: 150px;">
</td>
</tr>
<tr>
<th width="120" style="background-color:lightgray">자바점수</th>
<td>
<input type="text" name="java" class="form-control" required="required"
style="width: 150px;">
</td>
</tr>
<tr>
<th width="120" style="background-color:lightgray">스프링점수</th>
<td>
<input type="text" name="spring" class="form-control" required="required"
style="width: 150px;">
</td>
</tr>
<tr>
<th width="120" style="background-color:lightgray">글자색</th>
<td>
<input type="color" name="fontcolor" class="form-control" required="required"
style="width: 150px;" value="#ccffcc">
</td>
</tr>
<tr>
<td colspan="2" align="center">
<button type="submit" class="btn btn-outline-danger">서버저장</button>
</td>
</tr>
</table>
</form>
</body>
</html>
출력을 해보면

이렇게 나오고
Ex2FormReadController를 열어서
package day0914.controller;
import java.util.Map;
import org.springframework.stereotype.Controller;
import org.springframework.web.bind.annotation.GetMapping;
import org.springframework.web.bind.annotation.PostMapping;
import org.springframework.web.bind.annotation.RequestParam;
import org.springframework.web.servlet.ModelAndView;
@Controller
public class Ex2FormReadController {
@GetMapping("/study/form2")
public String form2() {
return "forms/form2";
}
@PostMapping("/study/read2")
public ModelAndView read2(@RequestParam Map<String, String> map)
{
ModelAndView mview=new ModelAndView();
mview.addObject("name",map.get("name"));
mview.addObject("hp",map.get("hp"));
mview.addObject("java",map.get("java"));
mview.addObject("spring",map.get("spring"));
mview.addObject("fontcolor",map.get("fontcolor"));
mview.setViewName("result/result2");
return mview;
}
}
이렇게 작성해주자
그리고
result2를 열어서

위와같이 작성해주고
다시 새로고침 후 값을 넣고 실행해보면
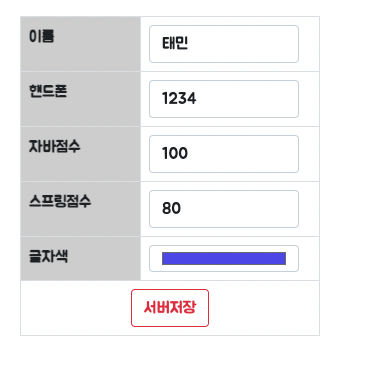

색상과 값이 정상적으로 잘 출력되는 것을 확인할 수 있다
sevlet-context.xml 파일을 열어서
<?xml version="1.0" encoding="UTF-8"?>
<beans:beans xmlns="http://www.springframework.org/schema/mvc"
xmlns:xsi="http://www.w3.org/2001/XMLSchema-instance"
xmlns:beans="http://www.springframework.org/schema/beans"
xmlns:context="http://www.springframework.org/schema/context"
xsi:schemaLocation="http://www.springframework.org/schema/mvc https://www.springframework.org/schema/mvc/spring-mvc.xsd
http://www.springframework.org/schema/beans https://www.springframework.org/schema/beans/spring-beans.xsd
http://www.springframework.org/schema/context https://www.springframework.org/schema/context/spring-context.xsd">
<!-- DispatcherServlet Context: defines this servlet's request-processing infrastructure -->
<!-- Enables the Spring MVC @Controller programming model -->
<annotation-driven />
<!-- Handles HTTP GET requests for /resources/** by efficiently serving up static resources in the ${webappRoot}/resources directory -->
<resources mapping="/res/**" location="/resources/" />
<resources mapping="/image/**" location="/resources/image/" />
<resources mapping="/upload/**" location="/resources/upload/" />
<!-- Resolves views selected for rendering by @Controllers to .jsp resources in the /WEB-INF/views directory -->
<beans:bean class="org.springframework.web.servlet.view.InternalResourceViewResolver">
<beans:property name="prefix" value="/WEB-INF/" />
<beans:property name="suffix" value=".jsp" />
</beans:bean>
<context:component-scan base-package="com.bit.mvc3,day0914.*" />
<!-- file upload setting -->
<beans:bean id="multipartResolver"
class="org.springframework.web.multipart.commons.CommonsMultipartResolver">
<beans:property name="maxUploadSize" value="5000000"/>
<beans:property name="defaultEncoding" value="utf-8"/>
</beans:bean>
</beans:beans>
이렇게 적어주고
form2를 복사해서 form3에 넣은다음
<form action="read3" method="post" enctype="multipart/form-data">
바디 앞에 적었던 코드에서
enctype을 추가해주자
주의할점은 하나라도 틀리면 안되니 오타에 유념하자
form3에 아래와같이 코드를 짜주고
<body>
<div style="margin: 30px 30px;">
<form action="read3" method="post" enctype="multipart/form-data">
<table class="table table-bordered" style="width: 300px;">
<tr>
<th width="120" style="background-color:lightgray">사진설명</th>
<td>
<input type="text" name="desc" class="form-control" required="required">
</td>
</tr>
<tr>
<th width="120" style="background-color:lightgray">사진</th>
<td>
<input type="file" name="upload" class="form-control" required="required">
</td>
</tr>
<tr>
<td colspan="2" align="center">
<button type="submit" class="btn btn-outline-danger">서버저장3</button>
</td>
</tr>
</table>
</form>
</body>
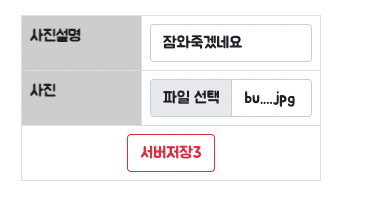
서버를 끈 후 다시 켜서 새로고침해보자
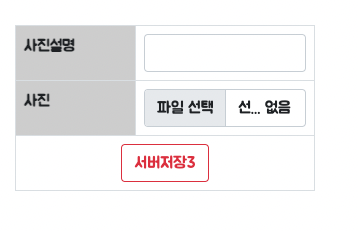
아래과같이 정상적으로 출력되는 것을 볼 수 있다
다음으로 컨트롤러 예제3을 열어보자
package day0914.controller;
import java.io.File;
import java.io.IOException;
import javax.servlet.http.HttpServlet;
import javax.servlet.http.HttpServletRequest;
import org.springframework.stereotype.Controller;
import org.springframework.web.bind.annotation.GetMapping;
import org.springframework.web.bind.annotation.PostMapping;
import org.springframework.web.bind.annotation.RequestParam;
import org.springframework.web.multipart.MultipartFile;
import org.springframework.web.servlet.ModelAndView;
@Controller
public class Ex3FormReadController {
@GetMapping("/study/form3")
public String form3() {
return "forms/form3";
}
@PostMapping("/study/read3")
public ModelAndView read3(HttpServletRequest request,
@RequestParam String desc,
@RequestParam MultipartFile upload)
{
ModelAndView mview=new ModelAndView();
//사진을 업로드 할 톰캣 내 프로젝트의 경로 구하기
String uploadFolder=request.getSession().getServletContext().getRealPath("/resources/upload");
System.out.println(uploadFolder);
//업로드 할 파일명
String fileName=upload.getOriginalFilename();
//위의 경로에 사진을 업로드하기
try {
upload.transferTo(new File(uploadFolder+"/"+fileName));
} catch (IllegalStateException | IOException e) {
System.out.println("파일 업로드 오류 발생 :"+e.getMessage());
}
//model에 데이터 저장
mview.addObject("desc",desc);
mview.addObject("fileName",fileName);
mview.setViewName("result/result3");
return mview;
}
}
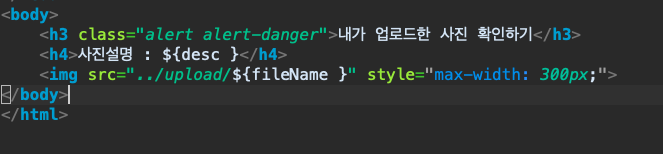
를 작성해주고 result3로 넘어가자
해당 코드를 작성해주고 서버를 껏다 다시킨 후 새로고침해서
사진을 업로드해보자
설명과 파일을 선택하고 서버저장을 해주면

이미지가 잘 출력되는 것을 볼 수 있다
세팅값을 까먹지말고 잘 알고 있어야한다
form4는 multiple을 이용해서 다중 선택을 줘서
이미지를 여러장 출력하게 만들수 있다
'BackEnd' 카테고리의 다른 글
| 관심사의 분리, MVC 패턴 - 실습 (0) | 2022.12.15 |
|---|---|
| 관심사의 분리, MVC 패턴 - 이론 (0) | 2022.12.15 |
| Base64 64진법이란? (0) | 2022.12.15 |
| 텍스트 파일 vs 바이너리 파일 (0) | 2022.12.15 |
| 자바의 정석 리터럴의 타입과 접미사 정리 (0) | 2022.06.29 |