스마트게시판
목표: 스마트 에디터 파일 사용하도록 만들기
테이블명 : smartbbs
num pr auto
writer
subject
content
mainphoto
readcount
writeday
* 비밀번호는 생략함
smartform.jsp : 글쓰기폼
smartaction : 글 저장
smartlist.jsp : 글 목록
updateform.jsp : 수정폼
updateaction.jsp : 수정처리
deleteaction.jsp : 삭제처리
contentview
퀀텀에서 테이블을 만들어주자
create table smartbbs (
num int auto_increment primary key,
writer varchar(20),
subject varchar(300),
content varchar(2000),
mainphoto varchar(100),
readcount int default 0,
writeday datetime);

우측 초록색 버튼을 눌러서 테이블 생성!
smartform.jsp : 글쓰기폼
smartaction : 글 저장
smartlist.jsp : 글 목록
updateform.jsp : 수정폼
updateaction.jsp : 수정처리
deleteaction.jsp : 삭제처리
위에 필요하다고 적어뒀던 jsp파일을
upload 폴더안에 모두 생성해주자
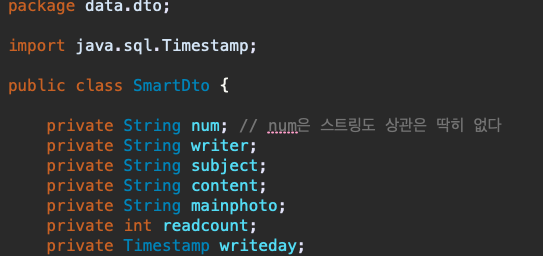
이제 dto 파일을 생성해주자
SmartDto라는 파일을 만들어서
private 값을 주고
setter getter 모두 작성해주자
public String getNum() {
return num;
}
public void setNum(String num) {
this.num = num;
}
public String getWriter() {
return writer;
}
public void setWriter(String writer) {
this.writer = writer;
}
public String getSubject() {
return subject;
}
public void setSubject(String subject) {
this.subject = subject;
}
public String getContent() {
return content;
}
public void setContent(String content) {
this.content = content;
}
public String getMainphoto() {
return mainphoto;
}
public void setMainphoto(String mainphoto) {
this.mainphoto = mainphoto;
}
public int getReadcount() {
return readcount;
}
public void setReadcount(int readcount) {
this.readcount = readcount;
}
public Timestamp getWriteday() {
return writeday;
}
public void setWriteday(Timestamp writeday) {
this.writeday = writeday;
}
이제 dao파일을 만들어주자
package data.dao;
import java.sql.Connection;
import java.sql.PreparedStatement;
import java.sql.ResultSet;
import java.sql.SQLException;
import java.util.ArrayList;
import java.util.List;
import data.dto.SmartDto;
import db.DbConnect;
public class SmartDao {
DbConnect db=new DbConnect();
//insert
public void insertSmart(SmartDto dto)
{
Connection conn= null;
PreparedStatement pstmt = null;
String sql="insert into smartbbs (writer,subject,content,mainphoto,writeday) values(?,?,?,?,now())";
//db연결
conn=db.getMysqlConnection();
try {
conn.prepareStatement(sql);
pstmt.setString(1, dto.getWriter());
pstmt.setString(2, dto.getSubject());
pstmt.setString(3, dto.getContent());
pstmt.setString(4, dto.getMainphoto());
//실행
pstmt.execute();
} catch (SQLException e) {
//바운딩
e.printStackTrace();
}finally {
db.dbClose(conn, pstmt);
}
}
//paging list
public List<SmartDto> getPagingList(int startNum,int perPage)
{
List<SmartDto> list=new ArrayList<>();
Connection conn=null;
PreparedStatement pstmt=null;
ResultSet rs= null;
String sql= "select * from smartbbs order by num desc limit ?,?";
conn= db.getMysqlConnection();
try {
conn.prepareStatement(sql);
//바인딩
pstmt.setInt(1,startNum);
pstmt.setInt(2,perPage);
rs = pstmt.executeQuery();
while(rs.next()) {
SmartDto dto= new SmartDto();
dto.setNum(rs.getString("num"));
dto.setWriter(rs.getString("writer"));
dto.setSubject(rs.getString("subject"));
dto.setContent(rs.getString("content"));
dto.setReadcount(rs.getInt("readcount"));
dto.setMainphoto(rs.getString("mainphoto"));
dto.setWriteday(rs.getTimestamp("writeday"));
//list에 추가
list.add(dto);
}
} catch (SQLException e) {
e.printStackTrace();
}finally {
db.dbClose(conn, pstmt,rs);
}
return list;
}
//전체갯수 반환
public int getTotalCount()
{
Connection conn= null;
PreparedStatement pstmt=null;
ResultSet rs= null;
int total= 0;
String sql = "select count(*) from smartbbs";
conn=db.getMysqlConnection();
try {
conn.prepareStatement(sql);
rs = pstmt.executeQuery();
if (rs.next()) {
total= rs.getInt(1);
}
} catch (SQLException e) {
e.printStackTrace();
}finally {
db.dbClose(conn, pstmt, rs);
}
return total;
}
//가장 최근에 추가된 글의 num값 얻기
public int getMaxNum()
{
int max=0;
Connection conn=null;
PreparedStatement pstmt=null;
ResultSet rs=null;
String sql = "select max(num) max from smartbbs";
conn=db.getMysqlConnection();
try {
pstmt=conn.prepareStatement(sql);
rs=pstmt.executeQuery();
if(rs.next()) {
max=rs.getInt("max");
}
} catch (SQLException e) {
e.printStackTrace();
}finally {
db.dbClose(conn, pstmt,rs);
}
return max;
}
//one select
public SmartDto getData(String num)
{
SmartDto dto=new SmartDto();
Connection conn=null;
PreparedStatement pstmt=null;
ResultSet rs=null;
String sql="select * from smartbbs where num=?";
conn=db.getMysqlConnection();
try {
conn.prepareStatement(sql);
//바인딩
pstmt.setString(1, num);
rs=pstmt.executeQuery();
if(rs.next())
{
dto.setNum(rs.getString("num"));
dto.setWriter(rs.getString("writer"));
dto.setSubject(rs.getString("subject"));
dto.setContent(rs.getString("content"));
dto.setReadcount(rs.getInt("readcount"));
dto.setMainphoto(rs.getString("mainphoto"));
dto.setWriteday(rs.getTimestamp("writeday"));
}
} catch (SQLException e) {
e.printStackTrace();
}finally {
db.dbClose(conn, pstmt, rs);
}
return dto;
}
//readcount update
public void updateReadCount(String num)
{
String sql="update smartbbs set readcount=readcount+1 where num=?";
Connection conn=null;
PreparedStatement pstmt=null;
conn=db.getMysqlConnection();
try {
conn.prepareStatement(sql);
//바인딩
pstmt.setString(1, num);
//실행
pstmt.execute();
} catch (SQLException e) {
e.printStackTrace();
}finally {
db.dbClose(conn, pstmt);
}
}
//update
public void updateSmart(SmartDto dto)
{
String sql="update smartbbs set writer=?,subject=?,content=?,mainphoto=? where num=?";
Connection conn=null;
PreparedStatement pstmt=null;
conn=db.getMysqlConnection();
try {
conn.prepareStatement(sql);
//바인딩
pstmt.setString(1, dto.getWriter());
pstmt.setString(2, dto.getSubject());
pstmt.setString(3, dto.getContent());
pstmt.setString(4, dto.getMainphoto());
pstmt.setString(5, dto.getNum());
pstmt.execute();
} catch (SQLException e) {
e.printStackTrace();
}finally {
db.dbClose(conn, pstmt);
}
}
//delete
public void deleteSmart(String num)
{
String sql="delete from smartbbs where num=?";
Connection conn=null;
PreparedStatement pstmt=null;
conn=db.getMysqlConnection();
try {
conn.prepareStatement(sql);
//바인딩
pstmt.setString(1, num);
//실행
pstmt.execute();
} catch (SQLException e) {
e.printStackTrace();
}finally {
db.dbClose(conn, pstmt);
}
}
}
smartform 파일을 작성해보자
<%@ page language="java" contentType="text/html; charset=UTF-8"
pageEncoding="UTF-8"%>
<!DOCTYPE html>
<html>
<head>
<meta charset="UTF-8">
<title>Insert title here</title>
<link rel="stylesheet"
href="https://cdn.jsdelivr.net/npm/bootstrap-icons@1.8.0/font/bootstrap-icons.css">
<link
href="https://cdn.jsdelivr.net/npm/bootstrap@5.1.3/dist/css/bootstrap.min.css"
rel="stylesheet" />
<link
rel="stylesheet" />
<script src="https://code.jquery.com/jquery-3.5.0.js"></script>
<!-- se2 폴더에서 js 파일 가져오기 -->
<script type="text/javascript" src="../se2/js/HuskyEZCreator.js"
charset="utf-8"></script>
<script type="text/javascript" src="../se2/photo_uploader/plugin/hp_SE2M_AttachQuickPhoto.js"
charset="utf-8"></script>
<style>
* {
font-family: 'Jua';
}
#blah{
position: absolute;
left: 700px;
top: 100px;
width: 300px;
border: 1px solid black;
}
</style>
<script>
function readURL(input) {
if (input.files && input.files[0]) {
var reader = new FileReader();
reader.onload = function (e) {
$('#blah')
.attr('src', e.target.result);
};
reader.readAsDataURL(input.files[0]);
}
}
</script>
</head>
<body>
<div style="margin: 30px 30px; width: 600px;">
<!-- 미리보기 이미지 -->
<img id="blah" src="../image/noimage.jpg" alt="your image" />
<form action="smartaction.jsp" method="post" enctype="multipart/form-data">
<table class="table table-bordered">
<caption align="top">
<h5>
<b><i class="bi bi-pencil-fill"></i>스마트 글쓰기</b>
</h5>
</caption>
<tr>
<th width="100" class="table-secondary">작성자</th>
<td><input type="text" name="writer"
class="form-control form-control-sm" required="required"
autofocus="autofocus" style="width: 150px"></td>
</tr>
<tr>
<th width="100" class="table-secondary">대표사진</th>
<td>
<input type="file" name="mainphoto" required="required"
onchange="readURL(this);">
</td>
</tr>
<tr>
<th width="100" class="table-secondary">제 목</th>
<td><input type="text" name="subject"
class="form-control form-control-sm" required="required">
</td>
</tr>
<tr>
<td colspan="2">
<textarea id="content" name="content"
required="required"
style="width: 100%; height:300px;" display: none;></textarea></td>
</tr>
<tr>
<td colspan="2" align="center">
<button type="button" class="btn btn-outline-danger" style="width: 120px" onclick="submitContents(this)">게시글 저장</button>
<button type="button" class="btn btn-outline-danger" style="width: 120px" onclick="location.href='smartlist.jsp'">목록으로</button>
</td>
</tr>
</table>
</form>
</div>
<!-- 스마트게시판에 대한 스크립트 코드 넣기 -->
<script type="text/javascript">
var oEditors = [];
nhn.husky.EZCreator.createInIFrame({
oAppRef: oEditors,
elPlaceHolder: "content",
sSkinURI: "../se2/SmartEditor2Skin.html",
fCreator: "createSEditor2"
});
//‘저장’ 버튼을 누르는 등 저장을 위한 액션을 했을 때 submitContents가 호출된다고 가정한다.
function submitContents(elClickedObj) {
// 에디터의 내용이 textarea에 적용된다.
oEditors.getById["content"].exec("UPDATE_CONTENTS_FIELD", [ ]);
// 에디터의 내용에 대한 값 검증은 이곳에서
// document.getElementById("textAreaContent").value를 이용해서 처리한다.
try {
elClickedObj.form.submit();
} catch(e) {
}
}
// textArea에 이미지 첨부
function pasteHTML(filepath){
var sHTML = '<img src="../save/'+filepath+'">';
oEditors.getById["content"].exec("PASTE_HTML", [sHTML]);
}
</script>
</body>
</html>
결과를 출력해서보면

이렇게 나오고 스마트에디터 형식으로 사용할 수 있다
se2라는 파일을 폴더화해서 넣어줬기 때문에 가능한 것이다
그리고 cos.jar파일을 lib에 추가해준다.
해당 파일은 참고자료로 받았기때문에 공유해도 되는지 모르겠다
파일선택을 눌러서 이미지를 넣어보면

이렇게 이미지를 원하는 파일로 바꿔주고
아래에 스마트에디터에서 사진 버튼을 눌러서 사진을 넣어주면
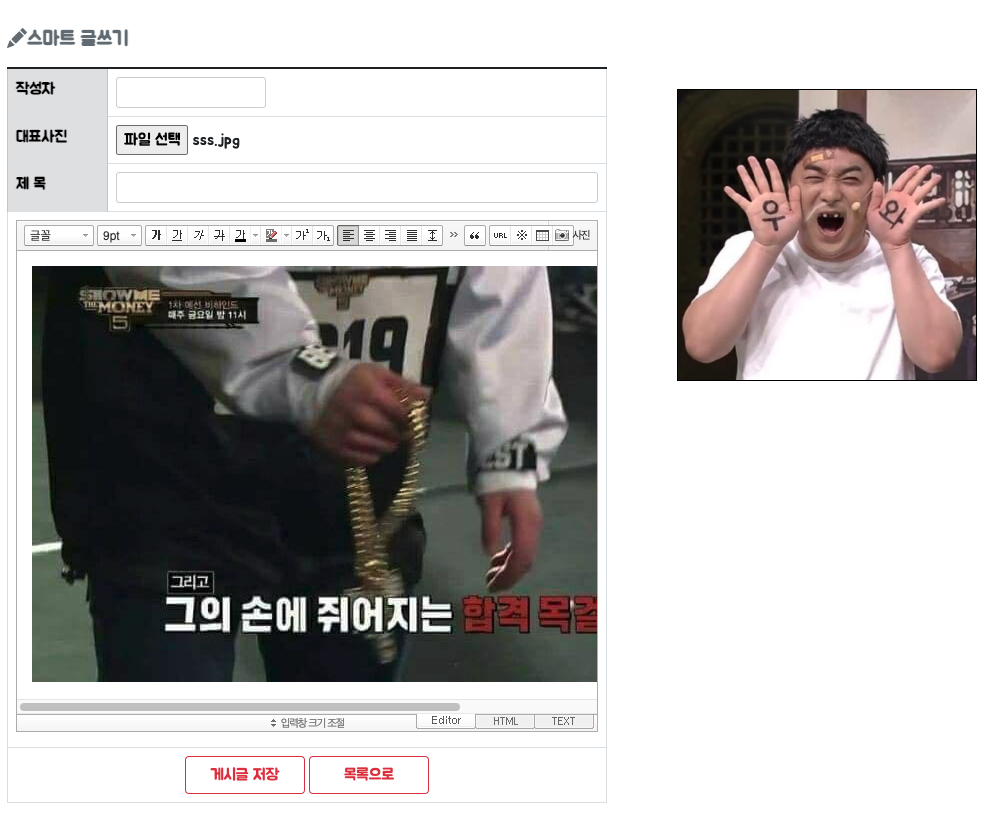
이렇게 작성 창 안에 원하는 이미지 파일을 넣을 수 있다

여러가지 내용과 사진을 임의로 간단하게 넣어주고
퀀텀에 데이터를 넣자

데이터가 잘 들어가는지 확인해보자
게시물 페이지 블럭 넘기기를 보기좋게 만들기위해
부트스트랩을 이용해보자
<link href="https://cdn.jsdelivr.net/npm/bootstrap@5.1.3/dist/css/bootstrap.min.css" rel="stylesheet">
<script src="https://cdn.jsdelivr.net/npm/bootstrap@5.1.3/dist/js/bootstrap.bundle.min.js"></script>
코드를 넣어주고
<%
//이전
if(startPage>1)
{%>
<ul class="pagination">
<li>
<a href="smartlist.jsp?currentPage=<%=startPage-1%>"
style="color: black;">이전</a>
</li>
</ul>
<%}
for(int pp=startPage;pp<=endPage;pp++)
{
if(pp==currentPage)//현재페이지와 같은 경우 약간의 css추가
{%>
<ul class="pagination">
<li>
<a href="smartlist.jsp?currentPage=<%=pp %>"
style="color: red; border: 1px solid gray;">
<%=pp %></a>
</li>
</ul>
<%}else
{%>
<ul class="pagination">
<li>
<a href="smartlist.jsp?currentPage=<%=pp %>"
style="color: black; ">
<%=pp%></a>
</li>
</ul>
<%}
}
//다음
if(endPage<totalPage)
{%>
<ul class="pagination">
<li>
<a href="smartlist.jsp?currentPage=<%=endPage+1%>"
style="color: black; ">다음</a>
</li>
</ul>
<%}
%>
이런식으로 코드를 짜주는데 해당 코드는

위 코드를 가져와서 수정해주었다
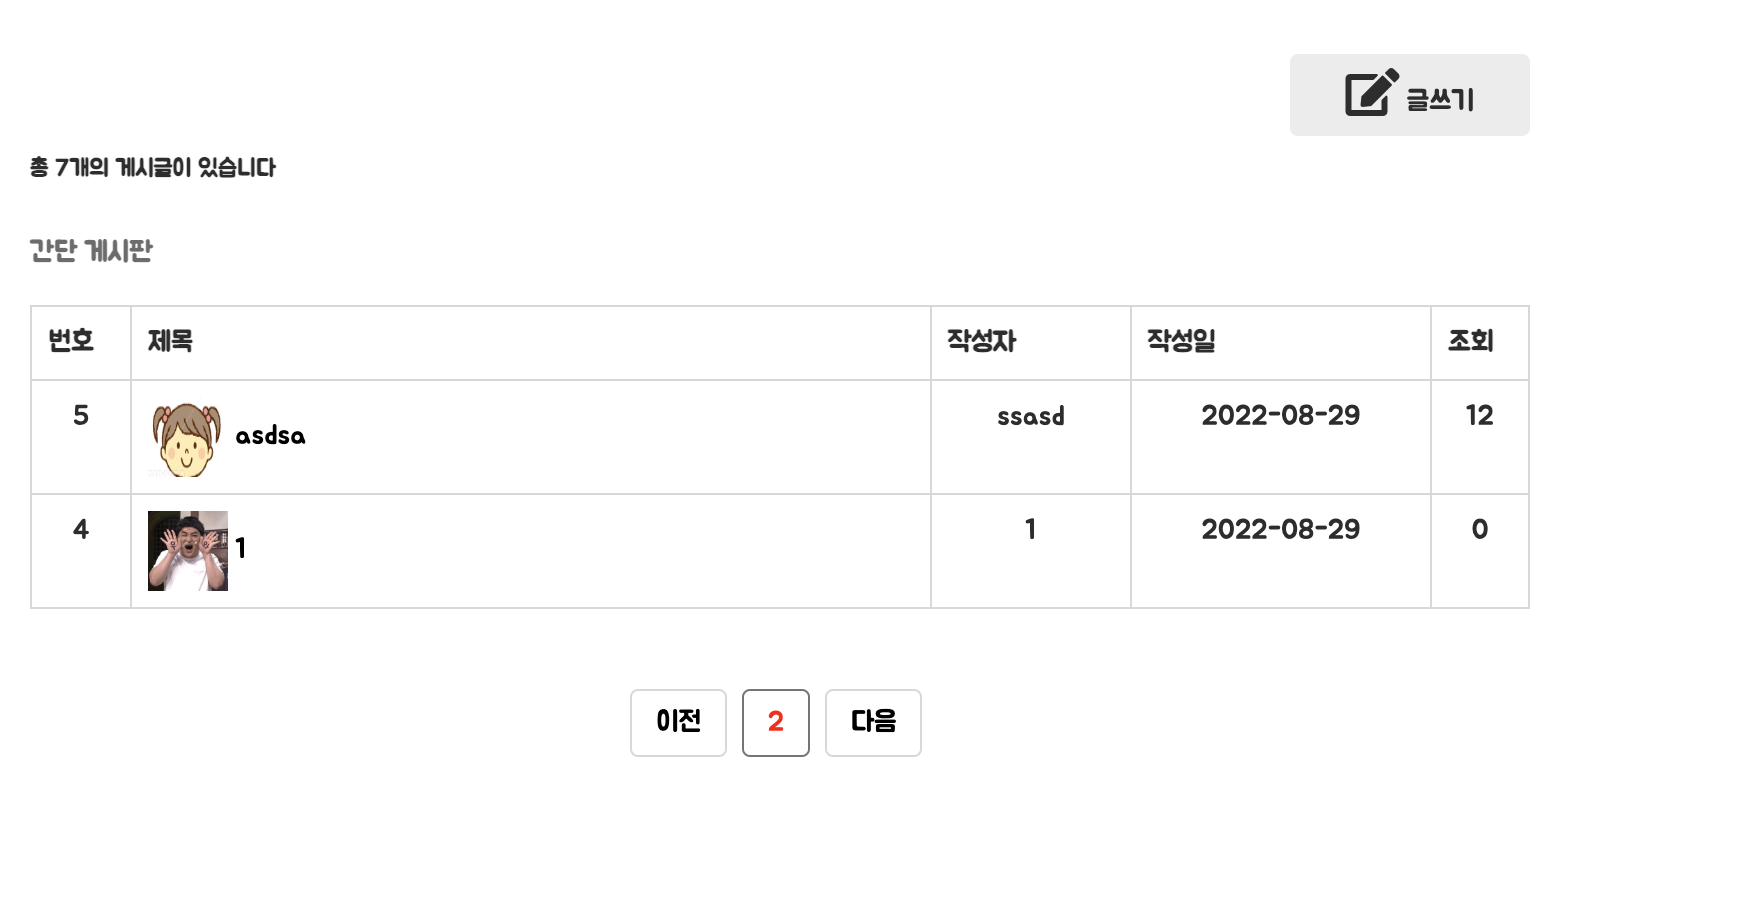
그렇게하면 리스트 페이지가 아래와같이 나온다
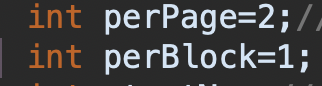
perPage=2;
perBlock=1;
이런식으로 값을 주면 위와 같이 나오게 되는데 보통 10을 준다고 한다
나는 5에 5를 줘보려고한다

그렇게주면 위와같이 5개씩 나오게된다
다음표시를 만들려면 어떻게 하면 될까?

2와 2를 줘서 다음표시를 나타낼 수 있고

다음버튼을 누르면 이전버튼과 함께 3,4 번째가 나온다
제목옆에 썸네일처럼 미리보기 이미지를 넣은 것을 볼 수 있는데
<img src="../save/<%=dto.getMainphoto()%>" style="width:40px; height:40px;"> <%=dto.getSubject() %></a></td>
위에처럼 코드를 작성해서 주제 subject옆에 img를 불러와서 보여줄 수 있고
정사각형으로 보기좋게 만들기위해 스타일을 줘서 넣어줬다
글쓰기 버튼을 눌러보자

해당 페이지에 임의에 값을 넣고
추가적으로 파일선택으로 이미지를 추가해보자

흔하게 사용하는 네이버에있는 스마트에디터 처럼
글꼴크기 글꼴선택 굵게만들기
배경색넣기가 가능하고 사진을 누르면
텍스트와함께 이미지를 넣을 수 있다
오른쪽에 나오는 사진은 위에 대표사진에서 이미지를 넣어줘서 변경하였고
해당 이미지는 나중에 게시물 목록에서 리스트를 보면 썸네일 형태로 보여진다
게시물을 저장하면

이미지가 보이고 그 다음 해당 제목이 나오고 작성자와 작성일이 나온다

클릭해서 들어가면 글쓰기를 바로 갈 수 있고
수정을 눌러서 수정도 가능하고
삭제를 눌러서 바로 지워버릴수도 있고
목록버튼으로 다시 목록 즉 리스트로 넘어가서 작성된 글을 볼 수 있다
현재 삭제 목록은 구현하였고
수정버튼이 구현되지 않아서 수정버튼을 구현한 후
다음글에서 이어서 작성하도록 하겠다
그럼 오늘은 여기까지!
파이팅하자
'개발' 카테고리의 다른 글
| Ajax를 알아보자 (0) | 2022.08.30 |
|---|---|
| 2022-08-30 스마트 에디터 게시판 만들기-2 (0) | 2022.08.30 |
| 2022-08-29 페이징처리 (0) | 2022.08.29 |
| 220721-객체 지향 언어 핵심 정리하기 (0) | 2022.07.21 |
| 220720-CSS 공부한 것 간단 정리 (0) | 2022.07.20 |